GUIDE • UPDATED July 2026 • TOPSERVER.NETWORK
How to Host an ARK: Survival Evolved Dedicated Server
Hosting your own ARK server can be a simple DIY project. There are hundreds of Ark server hosts, which you don’t need if have low requirements for uptime and ping. This article will show walk you through the process of setting up an ARK server.
Buying sever hosting VS Hosting Yourself
Setting up your own ARK: Survival Evolved dedicated server can be cheaper than buying game server hosting, but it is usually more difficult and far more hands-on. If you already have suitable hardware, your main costs may only be electricity and internet usage. Another option is renting a Virtual Private Server (VPS) or a dedicated server, which can sometimes cost less than specialised ARK server hosting while still giving you full control.
That said, self-hosting comes with trade-offs. When you run the server yourself, everything is your responsibility. You need to install it, configure it, maintain it, fix problems, create backups, monitor performance, and deal with crashes or downtime. For some players that level of control is a benefit, but for others it quickly becomes frustrating.
Using a VPS or dedicated server is often the better route if you are serious about running an ARK server but still want flexibility. While hosting from a spare PC or your own machine can be tempting, the hardware requirements, internet limitations, uptime concerns, and lack of support can make it harder than it first appears. A VPS or dedicated server can be a good middle ground, offering more freedom than standard game server hosting while avoiding some of the biggest risks of hosting from home.
Later in this guide, we will go over some tips to make self-hosting an ARK dedicated server easier and less risky. In the end, the right choice depends on your technical confidence, your hardware, your internet connection, and how much time you are willing to spend managing the server yourself.
For players who would rather rent a server instead, see our guide on choosing the right ARK server hosting provider.
Server Requirements
- 20GB Disk Space Minimum (50-75GB Recommended)
- 8GB RAM (This is very map and mod dependant)
- 2 CPU Cores @ 3.0GHz+ (For 10-15 players)
- 64 Bit Windows or Linux OS (Windows is often preferred)
- A reliable network connection, 100Mbps+ recommended
Before setting up an ARK: Survival Evolved dedicated server, make sure your machine meets the basic requirements. At minimum, you will need a 64-bit version of Windows or Linux, since the ARK dedicated server is a 64-bit application.
For storage, 20 GB is a sensible minimum, but in practice 50–75 GB or more is a safer target once updates, save data, and mods start to build up. SSD storage is strongly recommended for better loading times and smoother performance.
RAM is one of the biggest factors. The ARK dedicated server needs at least 6 GB of RAM to start, but a more realistic minimum for a small private server is 8 GB. If you plan to run larger maps, more players, or mods, you should expect to need 10–16 GB or more, depending on the setup.
CPU performance is also important. Older ARK dedicated server guidance suggests 2 CPU cores minimum, but strong single-core performance matters a lot, especially as more players spread across the map and server simulation load increases. For small servers, a modern CPU with at least 2 strong cores at around 3.0 GHz or higher is a reasonable starting point, but more headroom is always better.
Finally, make sure you have a stable internet connection with enough upload capacity to handle connected players. A reliable broadband connection is essential if you want acceptable server performance and uptime.
If you plan to run multiple ARK maps in a cluster, you need to size your hardware accordingly. The requirements above are only a good baseline for one ARK server. Each additional map increases CPU, RAM, storage, and overall system load, so clustered servers need more headroom to stay stable. The more players, mods, and background activity you add, the more important it becomes to leave plenty of spare resources available.
If your server does not have enough CPU power or RAM, you can expect slower startup times, stuttering, rubberbanding, and general server lag. Larger maps, active player populations, and heavier mod setups all place extra strain on the machine, so bigger worlds usually need stronger hardware. If you want to run a busier ARK server or a multi-map cluster, upgrading your CPU and increasing available memory is often necessary.
If you are hosting an ARK server from home, your internet connection may become the biggest limitation. Even if your hardware is good enough, weak upload speed can still hurt the experience for connected players. There is no perfect number that guarantees a certain player count, because usage depends on the map, settings, mods, and player activity, but for home hosting a stable 10 to 20 Mbit upload speed is a sensible starting point. More is always better, especially if multiple people will be using the connection at the same time.
Choosing Your Hosting Environment
Before setting up an ARK: Survival Evolved dedicated server, you need to decide which operating system you want to use. In most cases, that means choosing between Windows and Linux, and the option you pick will affect compatibility, memory use, setup experience, and long-term management.
Linux is often attractive because it is free and widely used for VPS and dedicated server hosting. It can be a strong choice if you are comfortable working with Linux and want to keep costs down. Windows is usually the easier option for users who are already familiar with it, and it is also the safer choice if you plan to use ARK Server API / ARKAPI, because the ARK Server API framework for ARK: Survival Evolved is aimed at servers running on Windows hosts.
One important difference is memory usage. Community ARK setup guidance notes that Linux can use more memory for the ARK dedicated server than Windows in some setups, so if you are working with limited RAM, this is worth considering. Exact usage will vary depending on your operating system version, map, mods, and server configuration, so it is better to treat this as a practical consideration rather than a fixed rule.
For beginners, Ubuntu is often the easiest Linux starting point because it is widely documented and commonly supported by hosting providers. If you already know your way around Linux, other distributions can work perfectly well too. On the Windows side, many VPS and dedicated server providers offer Windows Server as an installation option, and Microsoft still provides Windows Server 2016 evaluation editions that expire after 180 days.
If you are hosting from home, security should also be part of the decision. Running a public game server on the same machine you use for personal files is usually a bad idea. If that machine is compromised, your personal data could be exposed as well. For that reason, a separate PC, VPS, or dedicated server is usually the safer approach.
Quick summary
- Linux can be cheaper and is common for VPS hosting
- Windows is often easier for users already familiar with it
- ARKAPI / ARK Server API for ASE is Windows-focused
- Ubuntu is a sensible beginner-friendly Linux option
- Windows Server 2016 evaluation editions are still listed with a 180-day evaluation period
- A separate machine or hosted server is safer than exposing your everyday PC to the internet
Setup and Install SteamCMD
The first step is to download SteamCMD from the official Steam site. Once downloaded, create a new folder in a suitable location on your PC and extract the SteamCMD files into it. Keeping SteamCMD in its own dedicated folder makes the rest of the setup process much easier and helps keep your server files organised.
If you are using Windows, you may also want to consider ARK Server Manager (ASM). ARK Server Manager can make the setup process much easier for beginners, as it includes SteamCMD integration and provides a more user-friendly way to install, configure, and manage an ARK dedicated server.
Setup and Install SteamCMD
Once SteamCMD is ready, create a .bat file inside the SteamCMD folder you made earlier. This batch file will tell SteamCMD to download the ARK: Survival Evolved dedicated server files to a chosen install location.
In the example below, the server files will be downloaded to:
C:\ArkServer
If you want to install the server somewhere else, simply change the path in the script before running it.
After saving the batch file, launch it and allow SteamCMD to download the ARK server files. Once the process is finished, you can close the window.
					@echo off
start "" steamcmd.exe +login anonymous +force_install_dir "C:\ArkServer" +app_update 376030 validate +quit
A few quick notes:
376030is the ARK dedicated server app IDvalidatetells SteamCMD to check the files as they download+login anonymousworks because the ARK dedicated server can be downloaded without logging into a personal Steam account
Setup and Install SteamCMD
- Navigate to your installed Ark server files and go to the path: ShooterGameBinariesWin64
- Create a .bat file which you will use to start the server. We have created the code for you below as an example. You can freely change the session name and passwords to ones of your liking.
- Right-click anywhere in Windows Explorer in the folder where ShooterGameServer.exe is, then click New > Text Document. You’ll now see a file called New Text Document.txt. Double click it to open a new notepad window and paste the following:
					start ShooterGameServer.exe TheIsland?listen?SessionName=Changeme?ServerPassword=Changeme?ServerAdminPassword=Changeme?Port=7777?QueryPort=27015?MaxPlayers=10
exit
Now, click File > Save As. You should see your Win64 directory. Change Save as type: to All Files. In the File name field, write startserver.bat and press Save.
Let’s break down what each parameter in the code means.
- – MapName? – The name of the server’s map. “TheIsland”, The Center” etc.
- – SessionName=ArkServer? – This is simply the name of your server. Avoid symbols and spaces.
- – ServerPassword=Optional? – The server password if you want to lock the server down.
- – ServerAdminPassword=secretpasswords? – Admin password, change it and make it secure.
Setup The Server - Linux
If you choose Linux, use shell instead of batch and you will need different syntax. Open your favorite text editor and paste the following:
					#! /bin/bash
./ShooterGameServerTheIsland?SessionName=ChangeMe?ServerPassword=Changeme?ServerAdminPassword=Changeme Port=7777?QueryPort=27016?listen
Save that file to the Linux server files folder (usually something like /home/ark/server/ShooterGame/Binaries/Linux)and name it startserver.sh. If you’re wondering what’s with all those question marks, these are configuration options for the server – take a look above at the windows section for an explanation on each option. Before you try to start the server using the script, you need to make sure you can actually run it. You do that by opening the terminal in the same location of the file we just created. Now type:
$chmod +x startserver.sh
This command makes the file executable, as Linux is picky which files it lets you run for security reasons. You now start your server at any point by opening a terminal window from the folder and typing:
./startserver.sh
On Linux some extra tweaks and dependencies are required. Before you do anything, you need to install lib32gcc1.
We can do this via a very simple command in terminal:
sudo apt-get install lib32gcc1
Once the install is finished, type:
					mkdir ~/steamcmd
cd ~/steamcmd
This creates a new directory called steamcmd, then navigates us to it using the console. We can now download,extract, and install SteamCMD by pasting:
					wget https://steamcdn-a.akamaihd.net/client/installer/steamcmd_linux.tar.gz
tar -xvzf steamcmd_linux.tar.gz
./steamcmd.sh +login anonymous +force_install_dir /home/ubuntu/arkserver +app_update 376030 validate +quit
You will want to change the settings in order to make Ubuntu suitable for running a server. There are many items that need to be changed, such as the open file limit. In terminal, type:
					sudo /bin/su -c “echo ‘fs.file-max=1000000’ >> /etc/sysctl.conf”
sudo /bin/su -c “echo ‘* soft nofile 1000000’ >> /etc/security/limits.conf”
sudo /bin/su -c “echo ‘* hard nofile 1000000’ >> /etc/security/limits.conf”
sudo /bin/su -c “echo ‘session required pam_limits.so’ >> /etc/pam.d/common-session”
This adds the text in the single quotes to the relevant config files, so you can do it via Files if it’s easier for you. To ensure all these changes take, restart your PC.
Now we’re pretty much ready to start the server, we just need to create a script to start it. Go to your server directory in /home/ubuntu/arkserver/ShooterGame/Binaries/Linux.
Open Text Editor and paste:
					#! /bin/bash
ulimit -n 100000
./ShooterGameServer TheIsland?listen -server -lo
Now make the script executable by opening terminal and pasting:
					cd /home/ubuntu/arkserver/ShooterGame/Binaries/Linux

chmod a+x startserver.sh
Finally, start the server with:
./startserver.sh
Firewall Configuration
Before anyone outside your PC can join your ARK: Survival Evolved dedicated server, you need to make sure Windows Firewall allows the required connections. If the correct ports are blocked, players will not be able to connect even if the server is running properly.
On Windows, open the Start menu and search for Windows Defender Firewall with Advanced Security. Once it opens, click Inbound Rules, then select New Rule…
Choose Port, then click Next.
Select TCP, then choose Specific local ports and enter:
27016
Click Next, choose Allow the connection, then click Next again. Select the network profiles you want to apply the rule to, usually Domain, Private, and Public if appropriate for your setup. Click Next, then give the rule a clear name such as:
ArkServer TCP 27016
You will then need to repeat the process for UDP ports. Create another new inbound rule, but this time select UDP and add the following ports:
27015, 27016, 7777
Allow the connection, apply the same network profile choices, and give the rule a clear name such as:
ArkServer UDP Ports
After allowing the ports, you should also allow the server program itself through the firewall. Create another New Rule, choose Program, then click Next. Select Browse… and navigate to your ShooterGameServer.exe file in your ARK server installation folder, then allow the connection and complete the rule setup.
If you are only hosting for players on the same local network (LAN), you usually will not need any extra router configuration. If you want players from outside your home network to connect, the next step is setting up port forwarding on your router.
Linux Firewall Configuration
Ubuntu is easy to use and allows for opening firewall ports by following the example below.
					Sudo ufw enable
sudo ufw allow 7777/udp
sudo ufw allow 27015/udp
sudo ufw allow 27016/udp
sudo ufw allow 27020/tcp
You should check to make sure this worked correctly. To do that, type sudo iptables -L and verify if your ports are open under Chain ufw-user-input.
Linux Firewall Configuration
To enable Port Forwarding, you need to log into your router configuration page and specify which ports you want. There are no easy tools for this, so some steps may be different depending on your router. Use PortForward.COM to find your router or do a Google search for your routers guide.
Set Up the Server Configuration Files
Once the server files are installed, the next step is setting up your ARK server configuration files. These are the two main files used to control your server settings:
- GameUserSettings.ini
- Game.ini (advanced settings)
These files are usually found in:ShooterGame\Saved\Config\WindowsServer
GameUserSettings.ini is where you configure the main server settings, such as server name, passwords, rates, and general gameplay options.
Game.ini is used for more advanced settings, including breeding, custom multipliers, and deeper gameplay adjustments.
To make this easier, you can also use our ARK settings generators to build the config for you and then copy and paste the output directly into the correct files.
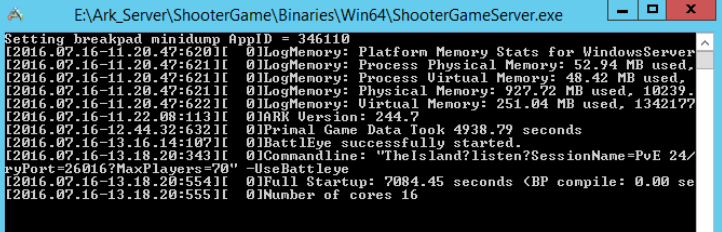
Start The Server
Once everything is done and ready to go all that is left to do is run the .bat script you created earlier. You will get a window pop-up like the example here. It will confirm when fully started up and ready to go. Depending on your world size, settings and mods will dictate how long the server takes to startup entirely from less than 60 seconds to up to 30 minutes. This startup time is also dependent on the hardware.
These steps were the very basic steps to acquire the ark server files, download them, and set them up to provide a working server. We hope you found it helpful.
If you would prefer to acquire a server from a dedicated server provider to host the server for you then we’ve compiled reviews and lists as well for this purpose, check those out below!
Resources And Other Help
- Ark Admins subreddit – a great community for troubleshooting, questions, or just general discussion.
- Steam Community – a point of call for any troubleshooting.
- ARK Gamepedia – guides, server settings, and more.
- ARK: Survival Evolved Game Walkthrough Universe – very useful scripts, customization tools, and tutorials.
- Linode VPS Hosting Guide - A simple guide on hosting ARK on Linode using Ubuntu
- Microsoft Answers – for help with Windows 10 and Windows Server
- Ask Ubuntu – for any Ubuntu related queries.